Building an algorithmic and automated trading system in crypto is not simple. It requires considerable expertise and a solid understanding of how crypto markets behave. There are dozens of potential use cases for building and deploying automated trading systems using APIs, as well-designed trading bots can often outperform human traders through speed, discipline, and consistency.
While the knowledge barrier remains relatively high, the process has become far more accessible thanks to the Bitunix API solution. The API streamlines development workflows and provides comprehensive API documentation, making it easier for developers and traders to build custom trading systems and deploy them directly on the Bitunix platform.
This guide provides a detailed, step-by-step explanation of how to create your first API key, understand the available endpoints, and deploy automated trading strategies on the Bitunix crypto exchange with confidence.
What Is an API and Why Use It for Trading?
Using an API might seem a little daunting at first, but it can be well worth the effort. An automated trading system can operate 24/7 and react to market movements without emotion, which gives it a considerable advantage over manual trading, especially in fast-moving crypto markets.
An API, or Application Programming Interface, is a set of rules that allows one software application to interact with another. In trading, APIs enable external programs, such as bots or custom dashboards, to interact directly with an exchange’s infrastructure.
In simple terms, APIs act as a communication bridge between two systems. Your trading bot sends instructions through the API, and the exchange responds with data or executes actions based on those requests.
Crypto trading platforms expose key functionality through APIs, including market data access, account information, and order execution. This allows traders to build systems that interact with the exchange without using the standard web interface.
Why Use An API
Automation: Run trading strategies continuously without manual input, removing emotional decision-making Speed: Place, modify, and cancel orders far faster than any human trader
Customization: Build tailored tools, dashboards, and analytics specific to your strategy
Backtesting: Pull historical market data to test, refine, and validate strategies before deploying them live
The Bitunix API: REST vs. WebSocket
The Bitunix API provides both REST and WebSocket APIs, giving developers the two tools they need to build successful automated trading systems. Each API serves a different purpose, and understanding how they work together is essential for building a reliable and high-performance trading infrastructure on Bitunix.
REST
Professional trading systems almost always use REST and WebSocket APIs in combination. REST is used to send instructions and manage accounts, while WebSocket is used to continuously listen to market activity in real time. Using both together allows systems to react instantly to market changes while maintaining precise control over execution.
The REST API is designed for actions. It operates on a request-response model, meaning the client sends a request and the server returns a response. Typical use cases include placing orders, canceling orders, checking balances, and retrieving account information.
Because of this structure, the REST API is best suited for account management and trade execution. It is reliable, secure, and ideal for actions that do not require real-time streaming data but must be confirmed and recorded accurately.
WebSocket
The WebSocket API, by contrast, provides a persistent, real-time data stream. Once connected, the server continuously pushes updates to the client without the need for repeated requests.
These push-based updates dramatically reduce latency and resource usage, making WebSocket the preferred choice for live market data, order book depth, price updates, and trade events. For automated trading systems that rely on speed and precision, WebSocket is essential.
In a typical automated trading system, WebSocket and REST work together in a complementary way. WebSocket streams live price data and order book updates in real time, allowing the system to detect trading signals the moment market conditions change. Once a signal is triggered, the REST API is used to place, modify, or cancel orders and to confirm execution and account balances.
What You Can Do with the Bitunix API
The Bitunix API allows developers to build almost any form of automated trading system they can imagine. Due to the platform’s extensive feature set, which includes spot trading and leveraged futures, developers are not restricted to simple strategies. Instead, they can design systems that react dynamically to market conditions and execute trades with precision.
Market Data Endpoints
Market data endpoints provide access to real-time and historical OHLCV data, live order book depth, and recent trade history for any trading pair. In practice, a trading bot might stream live prices and order book data to detect momentum shifts or liquidity gaps, while also pulling historical candles to validate signals against past performance.
Account Management Endpoints
Account management endpoints allow systems to monitor balances, retrieve deposit and withdrawal history, and track overall account activity. This is useful for enforcing risk controls, such as pausing trading when balances fall below a threshold or adjusting position sizes based on available margin.
Trading Endpoints
Trading endpoints enable full execution control, including placing market, limit, and stop-loss orders, canceling or querying open orders, and retrieving trade history and open positions. This allows bots to manage entries and exits precisely while maintaining visibility over current exposure.
When combined, these three endpoint groups form a complete trading loop. For example, a bot can use WebSocket market data to identify a breakout, confirm account balance through account endpoints, execute a trade using trading endpoints, and then manage the position in real time until exit conditions are met.
Getting Started - Your First Steps with the Bitunix API
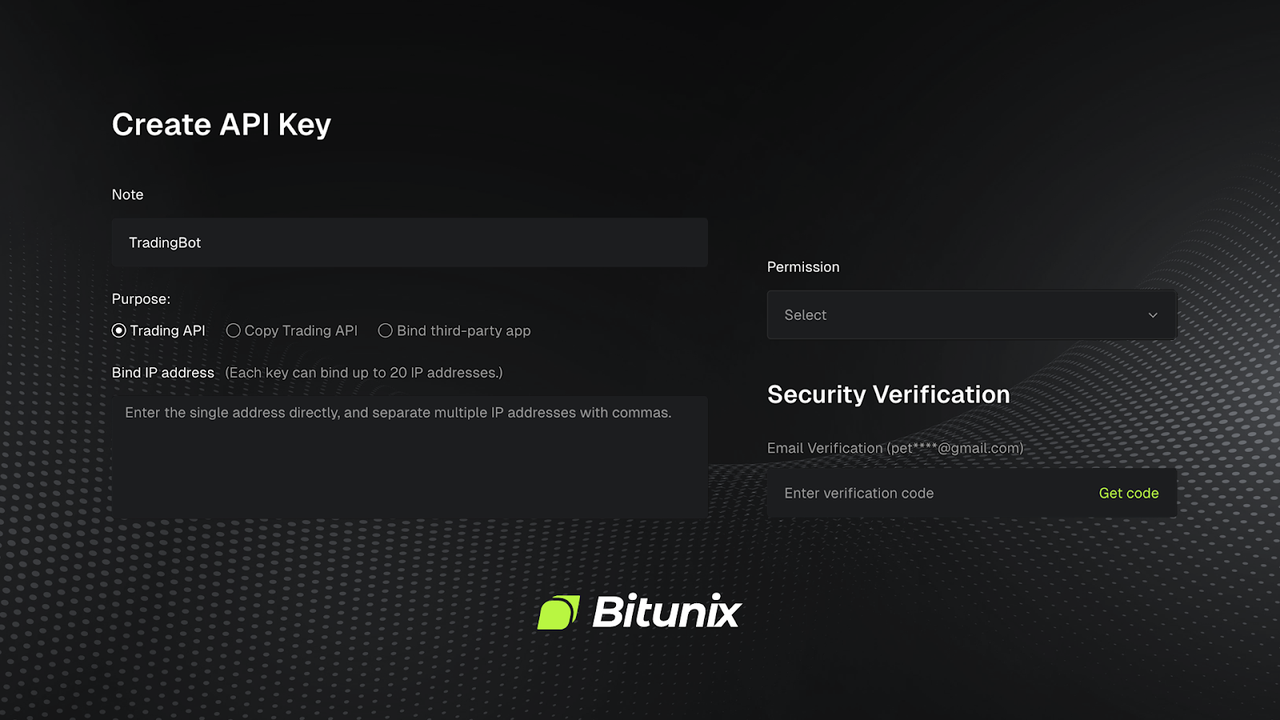
The first step to take before building your API is to sign up for a Bitunix account or download the application. Then you will need to navigate to the API section in your account. You will then need to select the purpose of the API, such as Trading API, Copy Trading API, or Bind Third-Party App.
Step 1: Generate Your API Keys
In the API menu, create a new key and give it a clear note/label such as “TradingBot” so you can identify it later. Bitunix will generate an APIKey and a SecretKey. The SecretKey is highly sensitive and is typically shown only once, so you must store it securely in a password manager or encrypted vault.
Step 2: Bind IP Addresses (Recommended)
If your trading system runs from a fixed server or VPS, add IP binding to restrict where the key can be used. Bitunix allows each key to bind up to 20 IP addresses, and multiple IPs can be entered, separated by commas. This is one of the most effective ways to reduce risk if a key is ever exposed.
Step 3: Set Permissions Carefully
Choose the minimum permissions required for your use case. If you are only pulling market data or building dashboards, select read-only permissions. If you plan to place trades, enable trading permissions. In most cases, you should avoid enabling withdrawal permissions, as withdrawals are the highest-risk permission category and are rarely needed for automated trading systems.
Step 4: Complete Security Verification
Bitunix requires security verification during API creation, typically through an email verification code. This step ensures that key creation is confirmed by the account owner and adds another security layer before the API becomes active.
Step 5: Choose Your Language or Tool
Select a development stack based on what you are building. Python is a common choice for bots and data analysis, while JavaScript is widely used for web dashboards and backend services. If you want to test requests quickly without writing code, tools like Postman are useful for validating endpoints, headers, and authentication logic before integrating into a full trading system.
Step 6: Make an Authenticated Request
Public endpoints generally provide market data without authentication, but private endpoints require signed requests using your APIKey and SecretKey. Bitunix uses a signing process that includes a timestamp and a nonce, and the signature is generated using double SHA-256 hashing. A simple first test is requesting your account balance through a private endpoint, which confirms that authentication, permissions, and signing are working correctly.
Step 7: Build the Trading Workflow
Once authentication is working, most developers build in stages: first market data streaming (often via WebSocket), then order execution (REST), then account and risk controls (balances, exposure limits, and logging). This structured approach helps you validate each component before moving to live trading and reduces the chance of costly errors.
Additional Information
In addition to the core endpoints covered in this guide, the dedicated Bitunix API documentation provides detailed instructions for a wide range of advanced features. These include market data endpoints such as order book depth, funding rates, klines, tickers, and available trading pairs, as well as position management endpoints for retrieving open, pending, and historical positions.
The documentation also covers full take-profit and stop-loss functionality, allowing developers to place, modify, and cancel orders programmatically. This makes the Bitunix API suitable not only for basic bots, but also for sophisticated futures trading systems with dynamic risk management.
Final Thoughts on Bitunix API
Using the Bitunix API to build trading systems unlocks a world of opportunities. Builders who use the Bitunix API benefit from detailed documentation and from the security and reliability of the exchange, which provides live proof of reserves and maintains a $30 million USDC Care Fund. While this guide outlines how to build an automated trading system, additional support is available in the Bitunix API documentation.